Monday, April 15, 2024

My Creative Scrapbook April 2024 Limited Edition Kit

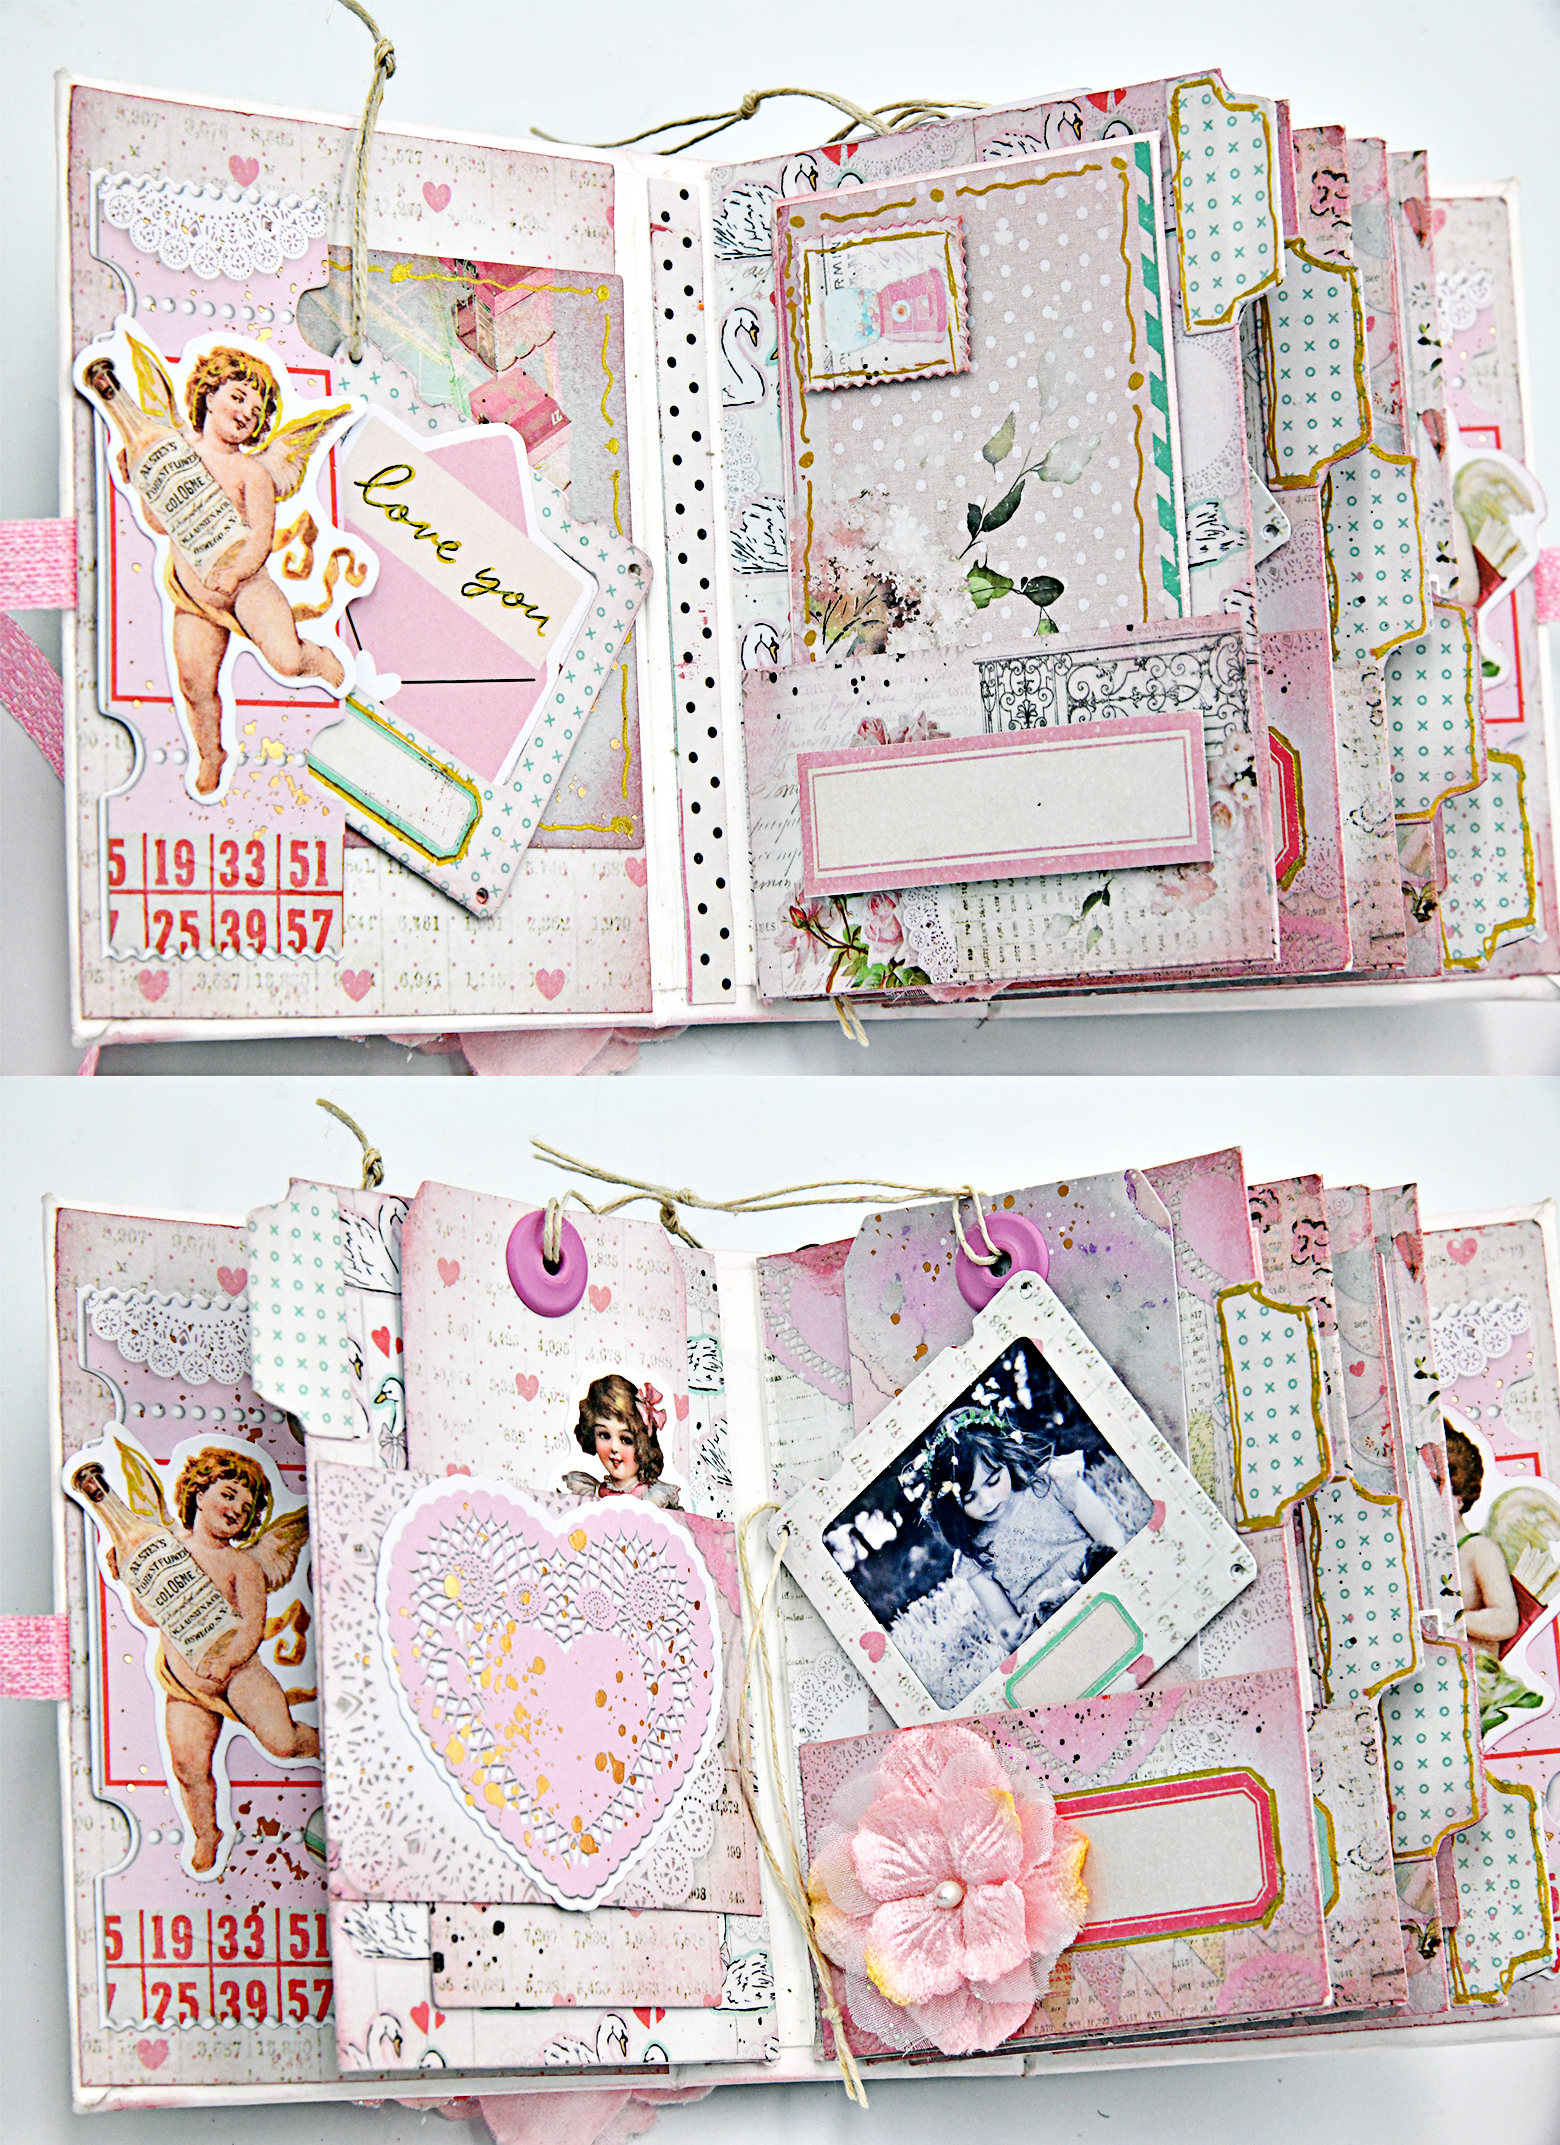
 Hello lovelies. I am back with my second layout as Guest Designer for My Creative Scrapbook. The April kit features Prima's In Full Bloom designed by The 3 Girls Tale. What a beautiful collection for a gorgeous kit! I am working with the April Special Edition kit. The pack of coordinating ephemera along with the Prima  flowers help to create this layout. I started with 1 piece of plain old white cardstock from my stash. I added splashes of color using inks and paints. The banner was hand cut using scraps from the various papers in the kit. I did some machine stitching around each piece, then edge distress them. I hole punched 2 holes on each piece and added an eyelet to each hole using my Crop-A-Dile.  I used some jute to string through the pieces to create the banner. I attached it to the background paper using pop dots under each peice just to elevate the banner for some dimension.  I matted the photo with another  piece of leftover scrap paper. 


I used some of the ephemera and flowers to create the clusters on the banner. I used some of the stamped leaves from the stamp set included in the kit, and die cut some leaves using the backs of the 4x6 cards included as well. It is a really pretty green. 


This is the cluster on the bottom of the layout. There are 2 small tags at the base that I created using scraps, then layered the ephemera and the flowers over them 


I did the same for the cluster on the top of the page. I also create banners using strips I cut from scraps, as well as the piece at the base of the 12 x 12 papers that are usually discarded. I always save them if they are pretty! I used the tiny heart in the stamp set, stamped it around the page and using a fine tipped marker, drew stitching lines around each heart. 


This layout was fun and simple to create. With the addition of a 12x12 piece of white cardstock, it gives you a blank canvas to show off the papers in the kit. And it was a great way to use the scrap pieces left over from the other 3 layouts I created. 

Get the MCS April Limited Edition Kit, and check out the other kits available this month. I know I want them all!! 

Follow the My Creative Scrapbook Blog to see what the designers have created using each of the different Kits that My Creative Scrapbook offers. There is a style for everyone!! 

Be Sure To Follow My Creative Scrapbook

Facebook

Instagram

Pinterest

Linktree


Wednesday, April 10, 2024

My Creative Scrapbook April 2024 Limited Edition Kit

 Hello Lovelies!! I have the honor and the pleasure of Guest Designing for a few months for  My Creative Scrapbook  using the Limited Edition Kits. The April Kit...My oh My!!! It is really beautiful!!! It features Primas In Bloom collection, designed by The 3 Girls Tale. Butterflies, Bees and Birds....There are also some coordinating papers from Memory Place and P13. Then to embellish the papers, you have ephemera, flowers, a cut file, a stencil, decorative chipboard, 4x6 cards, and a wonderful Page Evans stamp set that has a flower that is featured in this layout, because a girl can never have to many flowers!! 

I did some machine stitching on the base paper of the layout. I then die cut some hexagons, because after all, honeycombs are made from hexagons, and who doesn't love bees! But you could easily cut out hexagon shapes if you don't have a die. I simply adore how easily this layout came together. Just lay down those hexagons, and decorate with flowers and leaves. I added some pop dots in back of the hexagons to elevate them off of the page, and I elevated the photo a little more than the rest of the hexagons so it stood out. 

Here is the first of 4 layouts I created using the beautiful April kit. 

I love the cut file that came in the kit. With a play on words, I added the cute Bee to the letter A. "Bee Happy"!!! I sponged some texture paste onto the cut file for texture, and backed it with some paper. 


I die cut the photo of my granddaughter using the same hexagon die. The white and yellow flowers were created with the flower stamp in the Paige Evans stamp set that is included in the kit. I used archival ink in a mustard yellow color, then colored the middle with a watercolor distress crayon in yellow, then fussy cut them out.  The leaf in the stamp set was also used, and I stamped it with black, then colored it using a green archival ink. I think the flower and leaves are so cute!! And great for fillers! The beauty is you can color them any color you like. And you can make as many as you like. I think I am going to make more! Ill try layering them as well. 

 
I also tucked in the Prima flowers. They all coordinated so well. Just for a little texture when the layout was done, I did some splatters using white, and green acrylic paint watered down a little. I also used a Signo Uniball white pen to do some squiggly lines randomly on the paper. 


Follow the My Creative Scrapbook Blog to see what the designers have created using each of the different Kits that My Creative Scrapbook offers. There is a style for everyone!! 

Be Sure To Follow My Creative Scrapbook

Facebook

Instagram

Pinterest

Linktree


Sunday, March 31, 2024

Frank Garcia Design Team March 11 2024/ Mini album featuring Tim Holtz product.

When you think about Tim Holtz, you think of a gorgeous dark, grunged distressed style. I had a different vision. I was thinking pink, lovely, airy, not so distressed and created a mini album to showcase the dies. I mean mini. Like 3.5x4,5 with a 2 inch spine. Small but mighty as it is packed with beautiful goodness. I created my own album with chipboard and covering it with the beautiful Loves Notes paper. I used a gold metallic pen to highlight the little hearts on the paper, and doodled some lines around the edges of the album. For the front cover I used Loves Notes Chipboard Stickers and Love Notes Puffy Stickers to adorn the cover. I absolutely love the Prima Strawberry Milkshake Velvety Smooth Flowers. I used them on the cover and in the mini. Such a delicious color pink!! 


I had the pink ribbon in my stash that I matched with the papers. To close the mini just tie it up in a bow. 


This is the view from the back of the album. I hung the dome from a bead and chain dangle that I created using my own stash. 


I absolutely adore the little Idea-ology Decorative Domes. I just knew I had to do something special with them. So I took it apart, glued some moss on the bottom, placed a Prima Flower in the middle, fussy cut teeny tiny butterflies from the 6x6 French Blue paper, glued them to the top of tiny strips of acetate, then glued the base of the acetate to the flower. Then I placed the dome back on the base, tucking everything in carefully, and glued it onto the base. It looks like the butterflies are fluttering around in the dome. 


I gave the sweet little Idea-ology Salvage doll wings that I fussy cut from the  Prima French Blue paper, as the size was perfect. I scattered some  Idea-ology Gumdrop Hearts on the cover. The sparkle is beautiful!


Here is a shot of the book opened from the front. The  pages have tabs that make the pages easier to flip. The tabs are part of the Tim Holtz Sizzix Specimen die set. And it looks sweet too! 

These little collector packets were die cut from the Tim Holtz Collectors die by Sizzix. It coordinates beautifully with the Specimen die set. The cards were cut from the Love Noted collection. They fit perfectly! The backs were tied with thin jute, and the buttons were topped with The Loves Notes Puffy Stickers. 

 The little envelopes were created from The We R Memory Keepers Envelope Punch Board Mini. It created the smallest envelopes in different sizes just like the big Punch board. I love the mini one. Perfect for gift cards, and stuffing into mini albums like I did. Inside of each envelope I stuffed some fusst cut papers from the Love Notes paper collection. Save your scraps, it doesn't take much!. 


And my favorite die in the Specimen Collection?? The photo slide!!! I die cut 3 of them. 2 of them I backed the opening with acetate, and the 3rd, used some Love Noteds Ephemera and placed it in the opening. I added the jute for some added texture. 


The next few photos will show each page in the mini album. It is simply chock full of goodness. 


I simply adore a good little chunky mini. I could probably stuff some more into it. I left a couple of the pages blank, but now I have other ideas for them! 


Here are the last 2 pages. I created some bely bands on the pages to slide the pockets and envelopes into to keep them from sliding out of the mini. I just love layering the ephemera. The sizes are perfect for this little album. 

I hope you enjoyed looking through the album with me. I plan on tucking tiny photos  in it here and there. It is just so sweet! xo


Products Used:

Idea-ology Tim Holtz Salvages Dolls

Tim Holtz Sizzix Thinlets Dies Specimen

Tim Holtz Sizzix Thinlets Dies Collector

Idea-ology Decorative Domes

Idea-Ology Gumdrop Hearts

Love Notes by Frank Garcia 8x8 Paper Pad

Love Notes by Frank Garcia Puffy Stickers 

Love Notes by Frank Garcia Ephemera 999407

Love Notes by Frank Garcia Chipboard Stickers

Prima French Blue by Frank Garcia 6x6 Paper Pad

Strawberry Milkshake by Frank Garcia Flowers Velvety Smooth

We  R Memory Keepers Envelope Punch Board Mini

We R Memory Keepers Cop-A-Dile 

12x12 Acetate Sheet


Sunday, March 24, 2024

Uniquely Creative

 Uniquely Creative is an Australian Based Scrapbooking Company that offers gorgeous collections. And besides paper collections, they are a full service manufacturer of stamps, dies, flowers, die cuts, watercolors, watercolor pencils,  embossing folders, stencils, cardstock, albums, cardmaking supplies, embellishments. Then, there are the tools and storage supplies. And so much more!! 

Oh, and did I mention Subscriptions??? 

The Creative Kit Club (a craft class in a box)

Card Making Kits  (perfect for the card maker)

Storyteller Page Kits  (Tell your story every month, and capture those memories!)

The new March paper collection release id Peonies and Proteus. A beautiful collection featuring pinks and green florals with a touch of the Australian wild life. Who doesn't love a cuddly Koala!! 

I have had the pleasure of being invited to create with Peonies and Proteas, and also try out some of the fantastic tools that Uniquely Creative offer. Can I just say that I am in love with the scissors?? They are a fussy cutters dream!!! And so comfortable in the hand. Oh so sharp and precise. et into those tiny corners with ease. Fussy Cutting Scissors. And there is also an Edge Distressing tool, to create those perfectly distressed edges on your papers. 

I created a Folio, that was originally designed by the late Ginger Ropp. (My Sisters Scrapper)  It is one of my favorite folios to create. Peonies and Proteas was a perfect collection to create it. Here is the cover of the folio. I used fussy cut leaves, flowers, and Creative Cuts for the cover.


I had the perfect color soft pink ribbon in my stash that I used for the closure. 


Close up of the cover. I used Uniquely Creative Foam Mounts  to elevate the card for dimension. 


This is the inside of the folio. A pocket with a tag foldout accordion style card on one side, and a waterfall feature for photos on the other side. 


I created a fold out card from the cut out tags on the Peonies and Proteas Native Passion paper. There is a  matching Slim Stitched Nesting Tag die to easily die cut  the tags. 


I attached them with the same ribbon I used for the ties. I sandwiched the ribbon between the tags using a white card stock for the inside. I used the cut out cards to create pockets, and then used the Vellum Creative Cuts to adorn the white card stock. 


Close up of the waterfall feature. 

 
Here are the flaps, flipped up. Plenty of room for photos and journaling. 


On the back of the Folio, I used a Vellum Creative cut in the corner and placed a Creative Cut word over the floral vellum, 

Peonies and Proteas is simply just one of many Uniquely Creative  beautiful paper collections, and all of the embellishments that compliment the papers are simply perfect, and equally as beautiful!

Visit and follow Uniquely Creative on their website and on Social Media

Uniquely Creative Website
https://www.uniquelycreative.com.au/

Facebook
https://www.facebook.com/UniquelyCreativeKits/
Follow Uniquely Creative on social media

Uniquely Creative Website
https://www.uniquelycreative.com.au/

Facebook
Instagram
https://www.instagram.com/uniquely.creative.kits/

Pinterest
https://www.pinterest.com.au/source/uniquelycreative.com.au/

You Tube
https://www.youtube.com/channel/UCS9xKRxvOZJccGWD8nXOWGw?view_as=subscriber

Thanks for joining me in welcoming Uniquely Creative to the USA!!! 


Monday, March 18, 2024

Uniquely Creative

 There's a new kid in town....Uniquely Creative out of Australia, has landed in the United States!! I have had the pleasure to work with their product, and all I can say is that I am in love!! Here is a little sneak of what I will be working with. Uniquely Creative is a one stop shopping experience. They have gorgeous paper collections, cut apart sheets, dies, stamps, embossing folders, stencils, cardstock, albums, embellishments. I could go on!! But the scissors!!!...A fussy cutters dream!!!! And the paper distressor distresses perfectly!

I will be working with the beautiful collection Peonies and Proteas. Soft Pinks and greens showcasing florals, and the beauty of Australian nature. Look at this awesome collection new this month.


Thursday, February 29, 2024

Frank Garcia Studio

 Hello beautiful people. Today I bring you a layout using all product from Frank Garcia Studio. And today my main focus is on Moulds. I absolutely love Moulds, because there are so many ways you can adorn them. For my layout, I used Finnabair Silicone moulds in Nocturnal insects, and one of my all time  favorites, Baroque Frames. I created a dimensional layout by adhering pages from the 12x12 Love Notes, and adhering them to corrugated cardboard. This makes it perfect for a shadowbox. The photo is of my girlfriends gorgeous little girl. 


Here is a closer look at the 12x12 layout. I used 2 different patterned papers from Love Notes. On the top layer, I stenciled a design using Finnabair 6x9 Stencil Folk Florals. It is such a beautiful design . I hated to cover it up. I know I will use it again, and next time with texture paste! I used Tim Holtz Distress ink in Victorian Velvet, It was the perfect color to compliment the pinks in the papers. 


I layered the frames in a diagonal pattern, then snapped the smaller frame in half and added it to each edge of the bigger frames on opposite sides. You can snap the molds easily whether you use clay or resin. Just be careful and wear safety glasses just in case small pieces may fly out. Or place the resin in a towel before you snap it in half just to be safe. And I didn't want the pieces to be perfect in size, just close. I like the little bit of rustic look of the raw edges. To create the leaves for the gorgeous Prima Flowers, I die cut Tim Holtz Leaf Fragments using scraps of Loves Notes paper. I waste NOTHING. I used a blending brush and Tim Holtz Distress in k in Rustic Wilderness. It was the perfect green. Once all of the leaves were inked, I spritzed them with a light spray of water. Before they dried totally, I wrinkles them a little to give them some body. Once they were dry, I rubbed a tiny bit of the wax onto the leaves. 


I painted each piece of resin frames and moths in white gesso. This made it easier for the ink to adhere to it. Then I used the Metallique wax in white gold and rubbed it over the surface of the frames only to catch the raised parts. For the moths, I used a small brush to rub the wax all over including the crevices. I also rubbed a little Vintage Gold in parts to give it more dimension. Speaking of rustic, when you think Tim Holtz, you think beautiful grunge...BUT...It doesn't have to be. I made this layout, a little rustic, a little gold gilded and a whole lot of pretty!!! I also used some Metallic Flakes in Gold all around the page. I also dropped some gold Memory Hardware Pearls around the page as well. I just love the old world gilded feeling of the whole layout. 


Thank You for joining me this week. I hope that you are inspired to create your own projects. Shop at the Frank Garcia Studio. There is so much gorgeousness to be had!!

                                                             Frank Garcia Studio

Tuesday, February 6, 2024

Elizabeth Craft Designs/ Explosion Box

Hello there lovelies. Today I am bringing to you my very first  project for Elizabeth Craft Designs. I created an explosion box that is covered with the gorgeous Garden Party papers designed by Angelica Turner for Elizabeth Craft Designs. Are you thinking of spring?? Then this is your collection! But I am also thinking about Valentines Day...The month of love. And the surprise comes when you open the box. The entire Garden Party Collections designed by the very talented Angelica Turner is a must have. So many possibilities when creating! 


As you know, explosion boxes can hold anything from your favorite treats, to a small gift, another smaller explosion box, and even memorabilia such as photos. You create the surprise. Have fun with it! 


You can find directions on You Tube for creating the base for an explosion box, but I used We r Memory Keepers explosion box board. It gave me the option to create hearts for the corners that fold in. Because I am thinking about Valentines Day! 


When the box opens up, it reveals a tiny mini album that I created. The box is covered in the beautiful Garden Party Paper. On each flap of the inside of the box, I added a single flower that I die cut from the Wild Flower 3 die set. The heart corners can be used for journaling, or photos. 


Here is the top of the box. I used a couple of the Garden Party floral dies. Wild Flower 3 and Wild Flower 4. I colored them with watercolors, and added a tiny Styrofoam ball to the centers. I sprinkled a little glitter over the petals for sparkle. The flowers were die cut from Elizabeth Craft Designs  Soft Finish Cardstock

 
When you lift the lid, a tiny mini album is revealed. I followed a tutorial on You Tube to create a mini album using 1 sheet of 12x12 paper. So cute!!


I left the inside pages blank for journaling or tiny photos. I die cut a label using the Frames and Elements die, then I stamped it using the matching the Garden Party Elements stamp. I die cut and water colored the stems and buds from the Wild Flowers 2 die set, then arranged them around the label. 


I added a couple of painted wooden beads for the bottom of the explosion box and hot glued them to the base. It adds a little bit of elegance to the box. 


Thank you for joining me for this project. And if you shop with my affiliate link, it will save you 10% off of your order at Elizabeth Craft Designs!  Click here SAVE ME 10%